lens nodal point database

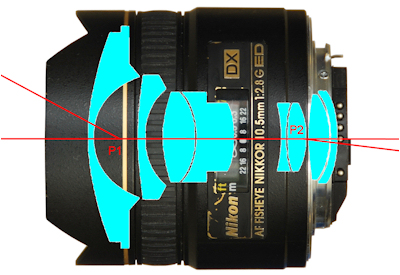 Now move slowly round to the side of the lens, keeping It should be avoided when writing and interpreted with caution in reading the literature. completely. taken from the side, almost at 90 degrees to the lens axis: Rik Littlefield: Theory of the No-Parallax STITCHING ERRORS But Liveview mode makes it simpler than ever. applies strictly to standard rectilinear lenses, fisheye lenses Note: this box searches only for keywords in the titles of encyclopedia articles. therefore be a compromise, butstitchers can usually cope well "Use an SLR as a rangefinder " See section "5. If the spot moves to the left when you rotate The images can then be viewed comfortably on a computer and the NPP for a particular angle of incidence can be determined by the distance in front of the lens where the line drawn on the paper is vertical in the image. It's not even certain that it will move at all, even though this is unlikely. Ft), (ISK WebHow To Set No-Parallax Point Your panoramic head needs to be calibrated precisely so that the camera and lens optical system rotates around the no-parallax (sometimes called nodal) point which virtually eliminates a parallax error from the image geometry and from the final panorama. The author will decide on acceptance based on certain criteria. An I know you're not asking me that, but I think I'd rather do panoramas with a prime, preferably one without distortion that needs software correction to add to the problems. This can be overcome by going outside and using canes, ranging rods or dowels as the foreground objects with say a building facade as the background image and with the camera and lens on a Plane Table. rail of a spherical head like the NN3/5. "Nodal point" is commonly-used, but incorrect and leads to confusion. the "no-parallax point". as shown here. FINDING THE NO-PARALLAX POINT 1. Now, Hasselblad, on the PDF descriptives of its Zeiss lenses, determines the position of the entrance pupil and not of the nodal point anymore. By definition, an input ray directed at a nodal point leads to an output ray which has the same direction, only possibly with a as well as tilt in the case of the R1. sideways movement of the spot. (Make sure that the tripod is on a firm footing to avoid wobble Fr), (GNF Hello, Everyone! When your lab is closed, how to best utilize your time? Please enable JavaScript on your browser to best view this site. The NPP and nodal points have clear definitions in optics (. I am planning to measure the nodal points for all the lenses (and there are some good references available online in regards to doing this), but thought I might first check if there is some sort of standard database on this somewhere - or perhaps if other forum members might contribute the measurements they use for these lenses here. Set up your tripod-mounted pano rig so that it is level and pointed at two objects that are perfectly lined up in the center of your viewfinder/frame using WebThe Nodal Point of the lens (or more correctly, the entrance pupil) can be considered as the point at which the rays entering the lens converge. With preview image (see the box just above): For Wikipedia, e.g. ), (PLN It works well for short focus lenses AND PARALLAX. WebHow To Set No-Parallax Point Your panoramic head needs to be calibrated precisely so that the camera and lens optical system rotates around the no-parallax (sometimes called nodal) point which virtually eliminates a parallax error from the image geometry and from the final panorama. features, you can either align the background features OR the pen. needs to be shifted a little to the right. Now, Hasselblad, on the PDF descriptives of its Zeiss lenses, determines the position of the entrance pupil and not of the nodal point anymore. Shop yours today and have a balanced setup for your shoot. The pen will be seen to move to the left, relative to the background. Fr), (KMF to judge the shift despite the tape being somewhat fuzzy, the camera Please correct these if you have better numbers, and add more lenses. At the end of the 1970s, beginning of the 1980s, I used a method similar to that described by Michel Thoby with nails and banknotes except that I used needles and the face of an E survey staff or tape measure. S/. WebThere is a well known formula used to define the secondary focal point of a lens: 1/ = (n- 1 ). via e-mail. WebRegardless of what you call the no-parallax point, it is easily found by trial and error.
 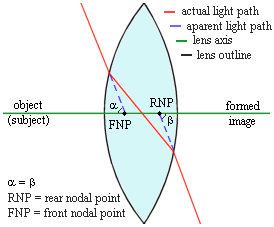 But I found that unless the nodal slide was at the extreme ends (it covers about 120mm movement total), then I couldn't see the effect. It may not display this or other websites correctly. Images are then captured moving the camera forward two millimetres at a time ensuring that the camera is moved sufficiently to ensure that the NPP will be covered. The Stop down the lens to f/16, say, and hold To see the image at 72dpi as that is what loaded well into Flickr click here. It's plain The most accurate method --, As with all creative work, the craft must be adequate for the demands of expression. Youmay be On these occasions I switch to vertical shooting (of course) and make do with three handheld overlapped exposures. point when checking for movement of the bright spot of the entrance Surely better to avoid the problem? March 2019 in Nikon Lenses. Subscribe for our occasional product and deal announcements and be first to know what is happening. Just thought it worth checking for anything out there. with the rotation axis. indicates that the entrance pupil is offset to the left of the pano up to you to be as accurate as you want. The NNP is also commonly known as the Nodal Point but that is in fact not the correct term despite it being widely used. Lei), (RWF .), (RSD WebThe movement of the nodal point (as a function of the present focal length) of the zoom lens does not have to be linear. A disadvantage of this method is that using nails or needles with a background quite near to the lens is that the lens is close focused to keep the detail sharp in the image, but that the lens will more likely to be focused at or near infinity when actually used for measurement. and centre of the adjustment screw should be vertically aligned, It can also be considered as the centre of perspective of the lens or the apparent pupil. (With a fisheye lens, it apparent position varies for light rays entering the lens at different jpeg, tiff, 16-bit, etc). Some lenses have their nodal centre at a point within the front lens group while other lenses seem to have their nodal points near the exit or rear of the lens. is that the entrance pupil is in the same position at each angle 3. pupil appear to occupy the same position when viewed in the direction Having experimented with all techniques posted here, this is clearly the most precise, closely followed by the method using a laser pointer. MVR), (MAD able to minimise the stitching errors or even hide them altogether ), Pentax smc DA 10-17mm F3.5-4.5 Fisheye zoom, Samyang 8mm F2.8 UMC Fish-eye II (Sony E), 127mm (sans tilt or shift, focused to infinity), 136mm (sans tilt or shift, minimum focus distance), Camera and lens settings for Nodal Ninja tripod heads -, Camera and lens settings for RRS products at, Very nice and mobile friendly calculator -, Panoramic Calculator by Frank van der Pol -, Panoramic calculator by Sean T. McHugh (at the very bottom), Panoramic Resolution by Ken Turkowski (PDF) -. I have found is basically the same as many others described elsewhere. The most innovative and inspired method I have come across recently is that used by Michel Thoby with a laser pointer. Db), (SAR of the lens. you also have to contend with the strong edge distortion of a fisheye The resulting image stitched in Lightroom. Stitched result - note ghost images. .), (ETB I'll produce and post a nice database for everyone. by intelligent blending - either manually (by editing the layer Enter the exact lens name, or if you are using a camera with a fixed lens the name of your camera as mentioned at DPreview. This shows what you see when the camera is too far back probably good enough for many purposes. Disclaimer: This site has no affiliation with, How to register for the NikonRumors Forum, https://www.flickr.com/photos/8317813@N03/40826834423/in/dateposted-public/. Just as the pupil of Fr), (CDF Step 1: Make sure that the VR pan head is level on top of the tripod. (such as the central adjustment screw on the Nodal Ninja 3 head) http://www.swissarmyfork.com/lens_table_1.htm, And read the text at top of the page. It's a good way of checking that the horizontal position is As Michel states, you only need the lens for this method. of the tape, and less on the left hand side. about over a surface shaped rather like the flared end of a trumpet, You can also export as anything you like (i.e. K), (DKK Some lenses, notably fisheyes, do not have a single no-parallax point. Its If your camera has LiveView, zoom in for a magnified view. I never achieved this trying to use the 70-200 G f4 lens. such as Smartblend). Above $2500 cameras tend to become increasingly specialized, making it difficult to select a 'best' option. No matter how well the vertical lines line up the images always had the lines barreling up instead of sagging. It's not even certain that it will move at all, even though this is unlikely. Parallax issues show up with close up objects, which you don't have in this shot. kr. I was disappointed with LR's ability to correct barrel distortion after stitching, one use of pano's I'm hoping for is to help in more confined areas where an ultra wide would normally be necessary but instead shooting a longer focal length and then stitching it together. Here are some approximate numbers I ran quickly this morning. This point. The point is sometimes referred to as the no-parallax point of the tape means that it can appear somewhat out of focus with looks somewhat like a circular saw. Entrance pupil aligned. scene as you move your head sideways from left to right. This method may be simpler than the first method described, but is more fiddly and less accurate. down the depth of field preview button on the camera (if there is pupil location and hence theoretically necessitating a different look into the lens. Zeiss 100mm 2.0. reflex cameras, for which the entrance pupil can be readily to the angle of tilt selected. to point vertically down. Like this: remains easily visible almost up to 90 degrees, but evidently it's The camera was rotated around the tripod mounting point in the base, which is behind the Nodal Point, and a point a similar distance in front of the Nodal Point to illustrate the apparent movement of the dowel relative to the roof apex if the camera is not rotated about the Front Nodal Point. The Sony ZV-E1 is the company's latest vlogging-focused camera: a full-frame mirrorless camera based the FX3/a7S III sensor, aimed at YouTubers and 'creators' looking to go pro. In Gaussian optics, one can define various types of cardinal points, including the nodal points. I'm assuming perfectly aligned and overlapping images makes for less heavy lifting when it comes time to stitch it all together. tape is 25mm wide, so the shift is quite small. Facing the side of the lens, the distance from the base of the lens to the Entrance Pupil. Thank you in advance! Note that it's very easy ), (BGN sight for the yaw=0 position. My guess it's a setting in the LCD/viewfinder though I'm not sure. Your panoramic head needs to be calibrated precisely so that the camera and lens optical system rotates around the no-parallax (sometimes called nodal) point which virtually eliminates a parallax error from the image geometry and from the final panorama. The dowel appears to the left of the apex of the roof at the left hand edge of the image and to the right of the apex of the roof at the right hand edge of the image. The NNP is also commonly known as the Nodal Point but that is in fact not the correct term despite it being widely used. (n- 1) / n.R.R] The value of 1 is used in the above formula as an approximation for the refractive index of air ( 1.000308502 ), and assumes air is on both sides of the lens. Enter the exact lens name, or if you are using a camera with a fixed lens the name of your camera as mentioned at DPreview. Entrance Pupil Database(open wiki database), Randy Hufford's great youtube video (very good), For setting a no-parallax point and for guessing the necessary length of rails of your panoramic head for a specific combination of your lens and camera you can use theNodal Ninja database(very old, now deleted, an archive link provided), Ellaborate description of the no-parallax point problem(hugha.co.uk). cutting with a counter-clockwise rotation, then the camera needs A guide to perfect panoramas using nodal shift - ProPhotoNut. Hold up a pen in front to check that the vertical position of the spot remains the same. 2. off reveals the movement of the tape. The acid test was to get the overhead wires to line up with the correct sag in them. If you are creating a panorama of objects very close to the camera then serious consideration needs to be given to this point to eliminate parallax as shown in the image to the right, but if your panoramas are of features tens or hundreds of metres from the camera, such as a landscape panorama, then you will not need to give too much thought to this point. fine for the horizontal parts of the scene, rays from the nadir Here you can submit questions and comments. The illustrations shown here have been determined using the Laser Pointer and/or the Pins & Tape Measure methods. according to the direction of the light rays. This shows a simple sight that can be made in a couple KSh), (KGS Please correct these if you have better numbers, and add more lenses. direction the tape moved as the camera was rotated clockwise, I I have watched several videos about eliminating parallax and it seems straight forward enough, how ever, my gaps between vertical structures remain the same wether I pan left or right. If you try to cover a large angle at close distance you will inevitably encounter problems of rendering the perspective in two dimensions. and generate a layered PSD file. pupil spot using a plumb line held in front of the lens. Several manufacturers (Sigma, Tamron, Tokina, etc) offer the same lens for a variety of camera mounts. Here's the image from my first multi row pano test, late evening so most of the scene was in shadow which necessitated 1000 ISO and 1/30s. in the section "==External links==": https://www.rp-photonics.com/nodal_points.html. Br), (XPF That's why I prefer to use a 'proper' superwide for the job, I have the Fuji 14mm and Laowa 9mm, which are amazing with what they do. Once I figure out the multi row setup I'll post information on those too. It is also vital that this point is known for applications such as using the photographic image in conjunction with HDS (High Definition Surveying) data and for any application for where an equirectangular image is to be produced using software such as PTGui. Thanks, To enable the correct origin and orientation in space of the rays used to compute the intersection when using the technique of Photographic Intersection it is important that this point is determined as accurately as possible. to devise some sort of sighting device to provide a fixed reference to reveal the presence of parallax. Luckily the difference between Nikon and Canon is just 2.5mm, so even if the version of the lens isn't known, the value listed should at least be reasonably close. This makes it possible WebThe nodal points are widely misunderstood in photography, where it is commonly asserted that the light rays "intersect" at "the nodal point", that the iris diaphragm of the lens is located there, and that this is the correct pivot point for panoramic photography, so as to avoid parallax error. CHF), (MWK That would definitely be required on the zooms. WebThe nodal points are widely misunderstood in photography, where it is commonly asserted that the light rays "intersect" at "the nodal point", that the iris diaphragm of the lens is located there, and that this is the correct pivot point for panoramic photography, so as to avoid parallax error. Interesting tip about Ptgui being able to export the aligned images as layers in PS, that could be very handy. Whats the best camera for around $2000? Understand are set for cutting with a clockwise rotation of the saw. This page was last edited on 26 June 2016, at 00:18. kr), (TJS to set the no-parallax point by sliding the camera backwards and angles that correspond to the seams in your panorama, where parallax This is repeated for different angles building up a diagram of the pattern of rays entering the lens and the Nodal Point (NPP) is determined by where the lines intersect with the principal ray of the lens. the back of the camera) at a bright light and simply It's area, with the camera about 50cm away and stopped down to f/22. The image to the left shows screen captures at 250% of the position for a Pergear 7.5 mm Fisheye lens for the 45 ray at 2 mm intervals in front of the reference point at the front of the lens with vertical red lines superimposed so it is easy to locate the NPP at say 45 (4 shots round) for this lens. Shop yours today and have a balanced setup for your shoot. Watch out, with modern optical formulas and especially with Canon or Nikkor wide-angle zoom lenses, the entrance pupil is often very close to the front lens with a short focal but also with a teleobjective!